Microstation Development Language (MDL) – Hello World

Let me start with very small a Hello World app using MDL programming. This will give an idea where to start, how to compile and produce a .ma file and run the .ma file. I will try to resist the temptation to add many theoretical details at first. Just want to give that eureka moment for a beginner MDL programmer. With further modules I will try to explain more in detail slowly. You can contact me in case you have any queries, you can put the comments or email me.

I am going to develop the HelloWorld mdl app on Microstation v7 in Windows enviroment. So make sure it is installed fully on your PC.

You are expected to have basic knowledge of C or C++, code debugging and compile error resolutions etc. You will also have to refer MDL Help from the Microstation menu, time to time.

There are a number of source file types involved (.mc, .h, .r etc.). You can write those using Notepad, Notepad++, Visual Studio or any other text editor.  In this example we will code HelloWorld.mc file.

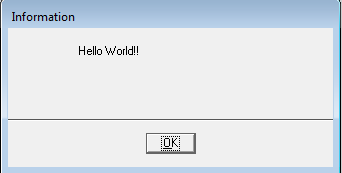
After compiling process, it will produce HelloWorld.ma which when executed; Microstation will interpret and show a dialog box.

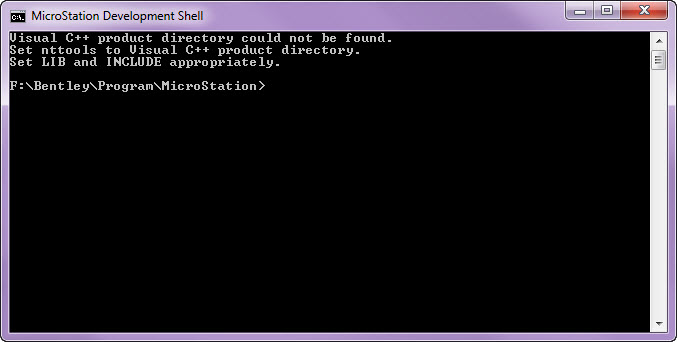
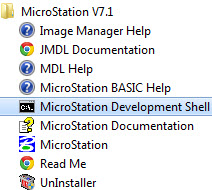
First, open the console window

1

This will open a command prompt as:

2

Create a HelloWorld.mc.

3

Write the following in HelloWorld.mc and save the file.

#include <mdl.h>
#include <dlogitem.h>

int main()
{
mdlDialog_openInfoBox(“Hello World!!”);
return 0;
}

The first two file are the preprocessing directives. The main function has a call to mdlDialog_openInfoBox function which will open a modal dialog box.

If you open Windows Explore, you will find under the MicroStation directory, there is folder as mdl\include. Note the whole path.

4

In the command prompt, type the following.

set MDL_COMP=-i<path to mdl include folder>

In my case, it is

set MDL_COMP=-iF:\Bentley\Program\MicroStation\mdl\include

This will help compiler to find where the .h (header files with function definitions) files are. Otherwise, you will get the errors such as Can’t include mdl.h

Now, start the compiling process. Use the MCOMP utility first. This will produce .mo file in the same folder where .mc file is.

6

Use the MLINK utility and produce the .MA file.

7

We are there!!

Open Microstation and give the command as

mdl l c:\temp\HelloWorld

It will show a dialog box.

9

You can refer the next lesson  Place a Linestring using MDL where you will learn how a linestring can be placed using MDL, you will also learn about dynamic update in the same lesson.
Cheers!!! smley

Microstation Development Language (MDL)

I was a MDL programmer couple of years back and used to love it so much. But with the career moves, it fell behind. I did my MDL programming on Microstation version 7 and some on version 8. I enjoyed developing DLM (dynamic link modules) using MFC. I just thought as this knowledge is becoming redundant to me, why not share it with some the beginner MDL programmers. In future I will try and post few blogs which would be easy to understand and help to get going. I will write blogs based on Microstation /J (v7).


.NET Custom Command in Intergraph’s G/Technology (GDesigner)

Today I’m going to show you how to get a very simple Hello World dialog running in the Intergraph G/Technology (GDesigner). Even though this is a pretty simple application, many developers may not know where to start; the probable reason could be that the supplied help is not comprehensive enough at the first sight. I would like to thank Stephan Deckers from Merkator for helping me to bridge the same gap in the past. I am documenting the steps in a very simple manner so that you don’t have to go through the struggle to start .Net development in G/Technology.

Create a dialog in a C# class library

To start with – I used Visual Studio 2012 with G/Technology 10.01 installed on the same machine.

  1. Create new project

newprojhw

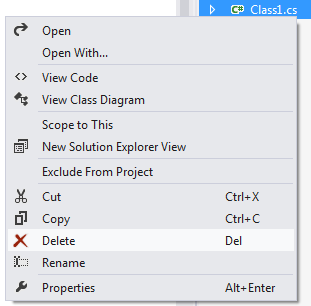
  1. Delete existing file which has a default class.

delclass1

  1. Add the references of G/Technology assemblies to the project as:

addref

Click on the Browse button in the Reference Manager.

Go to ..\Program Files (x86)\Intergraph\GTechnology\Program folder and select the following two references.

selref

Check them in the browse panel in the reference manager and click OK.

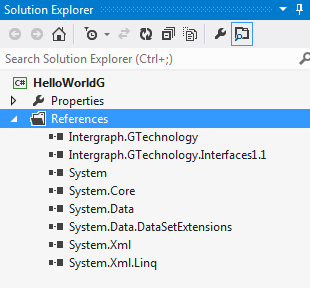
Make sure they appear in the references.

reftree

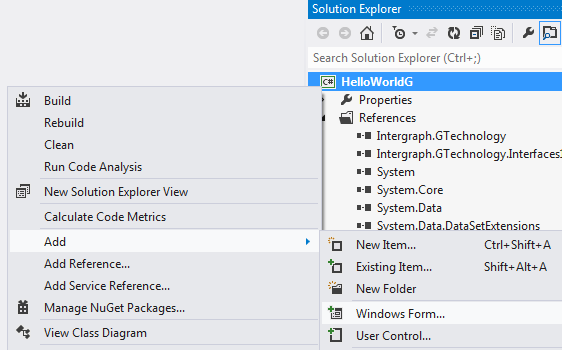
  1. Add a windows form to the project. I named it as HelloWorld.

addform

  1. Add a label on the form and set the properties as required.

Helloworlddialog

  1. Add a new class to the project and name it as HW_CCM.
  1. Open the code window of HW_CCM.
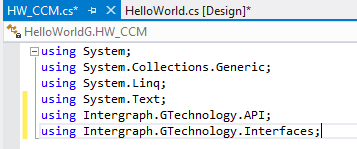
  1. Add the references of the assemblies at the top as

refheads

  1. Change the class to public class and implement the Interface IGTCustomCommandModal.

implementinterface

  1. Replace the Activate and TransactionManager methods as follows:

HWmethods

In Activate method you are creating the instance of the dialog box.

  1. You are now done. Now build the class library.

bldhw

bldhwresult

Deploy the class library

  1. Visit the output directory and copy the two files as shown below:

hwcopydll

  1. Note that you refer fileUNCPaths.xml and note the location for Customization node the two files above to the path. In my case its c:\myapp\bin.

xmlnode

Create a Metadata Entry in G/Technology

  1. Open GDesigner.
  1. Insert a new row to Custom Command in the Metadata Explorer.

HWMetadata

  1. Commit edits to the database and refresh Metadata Edits.
  1. Go to Tools->Customize menu.
  1. In Categories select Custom Commands and in Commands panel select the command (in my case it is MyCommand). Drag it to Tools Panel at the top and close.

Test the Dialogbox

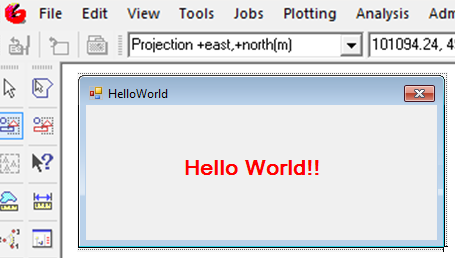
  1. Click on the icon, you will see the Hello World dialog.

hwdiagingtch

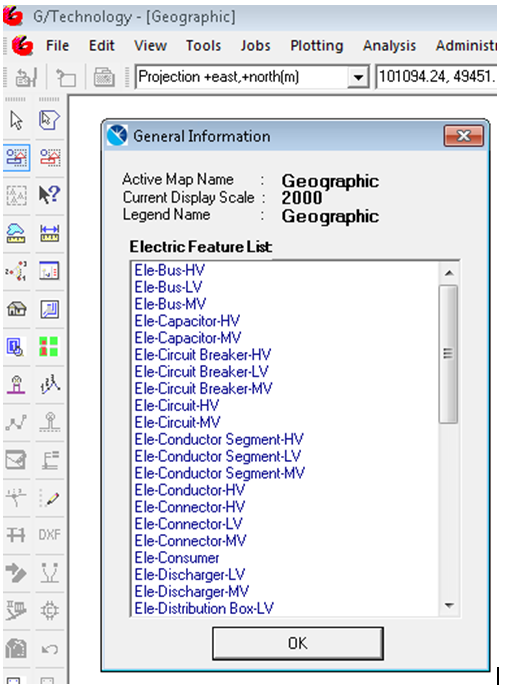
With some additional coding, the following dialogue displaying the runtime information.

hwadvdiag

I hope this quick tutorial helps. The aim here wasn’t to delve into any huge depth, but provide a very quick “Getting started” application. Enjoy Coding smley


OpenLayers – Cross Domain – Configure ProxyHost on Windows

Hi, I am posting this because I faced difficulty to configure ProxyHost on the windows platform to resolve the Cross Domain issue on the windows platform. The issue is discussed widely but there are no clear instructions available.

From the OpenLayers Wiki, due to security restrictions in JavaScript, it is not possible to retrieve information from remote domains via an XMLHttpRequest.

What we were getting was when the tooltip layer was coming into the scale tooltips would either not appear or you would receive the error message “Access is denied”.

The article details how to resolve the Remote Server restriction with the OpenLayers XMLHttpRequest.

Pre-requisite

Apache should be installed on the server where the client application is installed. In this case this web server IP is 193.120.94.133 and we are trying to resolve cross domain issue with the server with an IP 193.120.94.100.

Apache on 193.120.94.133 server is installed in C:\Apache folder

So here you go!

Install Proxy.CGI script file in Apache

If the OpenLayers.ProxyHost variable is not set to a valid proxy host, requests are sent directly to the remote servers. In most cases, the result will be a security exception, although this exception often occurs silently.

An example proxy host script is available here: trunk/openlayers/examples/proxy.cgi

The proxy script is configured for the Windows environment.

  1. Copy proxy.cgi to C:\Apache\cgi-bin folder.
  2. Edit the first line. Change the first line from #!/usr/bin/env python to #!/Python27/python

Note that it is assumed here that the Python is/will be installed in C:\Python27 folder.

3. Change the allowHosts array in the script. Change it from

allowedHosts = [‘www.openlayers.org’, ‘openlayers.org’,

                        ‘labs.metacarta.com’, ‘world.freemap.in’,

                        ‘prototype.openmnnd.org’, ‘geo.openplans.org’,

                        ‘sigma.openplans.org’, ‘demo.opengeo.org’,

                        ‘www.openstreetmap.org’, ‘sample.azavea.com’,

                        ‘v2.suite.opengeo.org’, ‘v-swe.uni-muenster.de:8080’,

                        ‘vmap0.tiles.osgeo.org’, ‘www.openrouteservice.org’]

to

allowedHosts = [‘www.openlayers.org’, ‘openlayers.org’,

                ‘www.openstreetmap.org’, ,’193.120.94.100‘]

Note that the cross domain server domain name is included which in this case is 193.120.94.100

4. Save the file and close.

 Install Python

  1. Download the installer from the link http://python.org/download/
  2. For this exercise, the following installer used was Python 2.7.3 Windows Installer.
  3. Install Python in C:\Python27 folder.

 Edit httpd.conf

  1. Open C:\Apache\Conf\httpd.conf.
  2. Locate the line <Directory “Apache/htdocs”>
  3. Scroll down and change the line Options Indexes FollowSymLinks to Options Indexes FollowSymLinks ExecCGI
  4. Locate the line <IfModule mime_module>
  5. Scroll down and change the line #AddHandler cgi-script .cgi to AddHandler cgi-script .cgi .py

 Restart the Apache Service

Restart the Apache service either from the control panel or running apache-restart.bat file.

 Test Python web page.

  1. Create a file test.py using notepad.
  2. Copy the following lines into the file.

#!/Python27/python

print “Content-type: text/html”

print

print “<html><head>”

print “”

print “</head><body>”

print “Test Page”

print “</body></html>”

3. Copy the test.py into the C:\Apache\htdocs folder

4. Test the web page by using the URL http://193.120.94.133:8080/test.py  (8080 is the port no configured for Apache). If the page runs successfully you should be seeing Test Page in the browser.

Edit the default.aspx in the client application

  1. In the client application add the following code in the map loading JavaScript in the beginning:

function LoadOpenLayersMap() {

try {

OpenLayers.ProxyHost = “http://193.120.94.133:8080/cgi-bin/proxy.cgi?url=&#8221;;

Test the client application

Test the client application. The map should not show any error and the tooltips should appear when cursor hovers over a feature when in scale range.


That is it!