Microstation Development Language (MDL) – Place LineString

Back to MDL blog again.. Today we will do a simple program which will explain you a number of things in MDL programming in a simplified manner.

We will place a line string through a MDL program. Remember that this code is only applicable to the older version (Microstation/J – version 7).

In this program, I am showing how to
1. Show a prompt to the user
2. How to initiate a function on a data click
3. How to initiate a function on the right-click (Reset)
3. How to show a rubber band effect
4. How to generate a linestring in the end

The code is simple and self-explanatory but I will still add some description for you to understand.

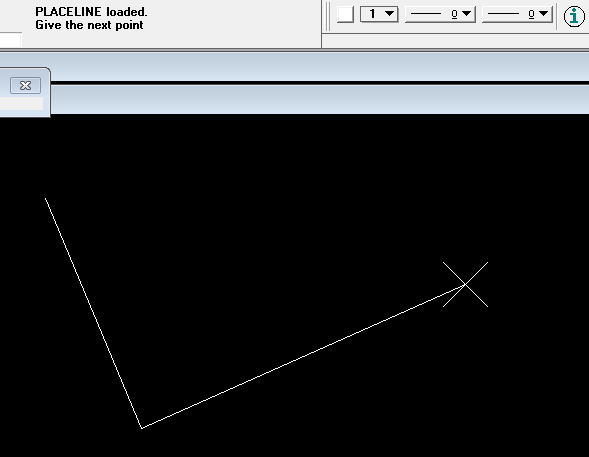
In the program a prompt will ask use to give a point, when user gives a point in the view, an array of points will be populated and a counter of the number of vertices will be maintained. When user gives a right-click, the linestring placement will complete and a linestring will be generated. The user will be also see the rubber band dynamic display of the linestring as he gives point.


//include files
#include <mdl.h>
#include <tcb.h>
#include <mselems.h>
#include <userfnc.h>

//variable to create the linestring
MSElementUnion oElm;

//maximum 101 vertices – This is an array of coordinates
Dpoint3d lsPoints[MAX_VERTICES];

//number of vertices for the dynamic display of the linestring
int ntmpcount = 0;

//number of vertices to create a final linestring
int nvertexCount = 0;

//function definitions – if not added then it will not compile
void LS_NextPoint(Dpoint3d *point,int numView);
void LS_Complete(Dpoint3d *point,int numView);

//Dynamic display function, it is passed a cursor coordinate as the //cursor moves in the map
//dgnBuf is used for the dynamic display
//If this function is not defined then user will be able to give a point //in the map as usual but will not see how his linestring is appearing //in the map at the runtime.

int LineStringDynamics(Dpoint3d *ptP,int view)
{
ntmpcount = nvertexCount;
lsPoints[ntmpcount].x = ptP->x;
lsPoints[ntmpcount].y = ptP->y;

mdlLineString_create(dgnBuf, NULL, lsPoints, (ntmpcount+1));

return (SUCCESS);
}

//This is function receives a point on a data click, point array is //populated and vertex counter is incremented. The function calls itself // on a dataclick, it also sets a dynamic display function and complete //function on a right-click
void LS_NextPoint(Dpoint3d *point,int numView)
{

lsPoints[nvertexCount].x=point->x;
lsPoints[nvertexCount].y=point->y;

nvertexCount = nvertexCount+1;
mdlOutput_prompt(“Give the next point”);

mdlState_setFunction (STATE_DATAPOINT,LS_NextPoint);
mdlState_dynamicUpdate (LineStringDynamics, FALSE);
mdlState_setFunction (STATE_RESET,LS_Complete);
}

//When user gives a right-click the complete function is called, line //string is created, added to the file displayed normally, dialog box //shows a message to the user about the completion of the command and a //default command call is made. The Exit function call is made in the //end
void LS_Complete(Dpoint3d *point,int numView)
{
if(nvertexCount<2)
{
mdlOutput_prompt(“Give next point”);
mdlState_setFunction (STATE_DATAPOINT,LS_NextPoint);
}
else
{

mdlLineString_create(&oElm, NULL, lsPoints, nvertexCount);
mdlElement_add (&oElm);
mdlElement_display (&oElm, NORMALDRAW);
mdlOutput_prompt(“”);
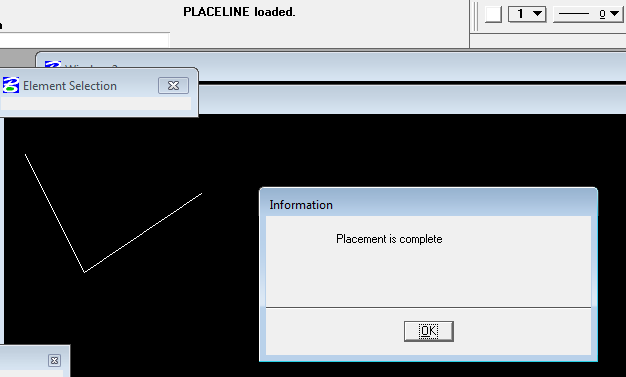
mdlDialog_openInfoBox(“Placement is complete”);
mdlState_startDefaultCommand ();
mdlSystem_exit(NULL,1);
}
}

//program entry point – the function prompts user to give a first point
//A function call on a data click is set

int main(int argc, char *argv[])
{
mdlOutput_prompt(“Give the first point”);
mdlState_setFunction (STATE_DATAPOINT,LS_NextPoint);
return 0;
}


As you see the code above can be saved as a whole (with comments) in a file placeline.mc and compile as explained in the blog – Hello World MDL

Open a dgn file and execute the command as

mdl l \placeline

See the dynamic display below:

rubberband

The linestring placement is complete.

lscomplete

I will add more blogs on MDL, any comments or questions are welcome! Thank you!

EPPlus, Great Library to work with Excel in Dot Net

EPPlus is an open source .NET library. It is so good when you want to read and write Excel files (2007/2010), it makes life easy in a fast paced development requirement. I would like to give brief introduction to the developers who don’t know about it.

The Office Interop is NOT supported by MS in “server-like scenarios” like Citrix. It throws automation exceptions. I am not going into much detail there. But once you have EPPlus then there is no need to install Excel component.

Refer the link http://epplus.codeplex.com/ and download the library binaries.

In the example code below, I am creating a new excel file using a template excel file. The template file has the columns and styles defined. In the newly created file, I am just pasting the data from second row onwards.Note some of the code here is little crude, sorry about that. (Please ignore)  🙂

Create a C#Dot Net project and add a reference [Project -> Add Reference].

Add the following two lines to your module:

using OfficeOpenXml;
using OfficeOpenXml.Style;

//Writing an Excel file:

FileInfo template = new FileInfo(“T:\\template\\sampletemplate.xlsx”); 
FileInfo newFile = new FileInfo(“T:\\output\\CopiedFile.xlsx”);

using (ExcelPackage xlPackage = new ExcelPackage(newFile, template))
{
      //The new Excel file is not copied, it is still in memory

      //Get the wosksheet called SAMPLESHEET from the new excel file

ExcelWorksheet worksheet = xlPackage.Workbook.Worksheets[“SAMPLESHEET”];

DataTable dt = GetDataTable();

      //The function code not listed and no validation added for the validation

//This populates the excel file, I wanted it to paste the data from column C and //second row

worksheet.Cells[“C2”].LoadFromDataTable(dt, false);

//I know in my code that the excel file has 14 columns, note that the 

 const int startRow = 2;

 int row = startRow;

for (int iCol = 1; iCol < 14; iCol++)
{

        //Change the style of all the cells  for the rows written using a style from a particular cell which had the style set

               for (int iRow = startRow; iRow < (startRow + dt.Rows.Count); iRow++)
              {
                   worksheet.Cells[iRow, iCol].StyleID = worksheet.Cells[startRow, 3].StyleID;
                }

}

      //The template file has more than 10000 rows,  deleting the extra rows and just keeping rows written from datatable.

worksheet.DeleteRow((startRow + dt.Rows.Count), (worksheet.Dimension.End.Row – dt.Rows.Count));

//This will save the file as T:\\output\\CopiedFile.xlsx
xlPackage.Save();

  }

Reading an excel file

using (ExcelPackage xlPackage = new ExcelPackage(existingFile))
{

// get the first worksheet in the workbook
ExcelWorksheet worksheet = xlPackage.Workbook.Worksheets[1];

//Get start and end range values from the excel file.

var start = worksheet.Dimension.Start;
var end = worksheet.Dimension.End;

for (int iRow = 2; iRow <= end.Row; iRow++)
{

string cellval = (string)worksheet.Cells[iRow, 1].Value;
if (string.IsNullOrEmpty(cellval) == false)
{

//Perform required action
}

}

//usage of LINQ – Get all the values from column D, then filter it

var dValues = from cell in worksheet.Cells[“D2:D” + worksheet.Dimension.End.Row.ToString()]
where cell.Value.ToString().Equals(worksheet.Cells[irow, 4].Value.ToString())
select cell;

//Copy range of values from a spreadsheet to another. The code for creating errorworksheet is not given here

worksheet.Cells[string.Format(“C{0}:T{0}”, irow)].Copy(errorworksheet.Cells[string.Format(“C{0}:T{0}”, errrowcnt+2)]);

}


Microstation Development Language (MDL) – Hello World

Let me start with very small a Hello World app using MDL programming. This will give an idea where to start, how to compile and produce a .ma file and run the .ma file. I will try to resist the temptation to add many theoretical details at first. Just want to give that eureka moment for a beginner MDL programmer. With further modules I will try to explain more in detail slowly. You can contact me in case you have any queries, you can put the comments or email me.

I am going to develop the HelloWorld mdl app on Microstation v7 in Windows enviroment. So make sure it is installed fully on your PC.

You are expected to have basic knowledge of C or C++, code debugging and compile error resolutions etc. You will also have to refer MDL Help from the Microstation menu, time to time.

There are a number of source file types involved (.mc, .h, .r etc.). You can write those using Notepad, Notepad++, Visual Studio or any other text editor.  In this example we will code HelloWorld.mc file.

After compiling process, it will produce HelloWorld.ma which when executed; Microstation will interpret and show a dialog box.

First, open the console window

1

This will open a command prompt as:

2

Create a HelloWorld.mc.

3

Write the following in HelloWorld.mc and save the file.

#include <mdl.h>
#include <dlogitem.h>

int main()
{
mdlDialog_openInfoBox(“Hello World!!”);
return 0;
}

The first two file are the preprocessing directives. The main function has a call to mdlDialog_openInfoBox function which will open a modal dialog box.

If you open Windows Explore, you will find under the MicroStation directory, there is folder as mdl\include. Note the whole path.

4

In the command prompt, type the following.

set MDL_COMP=-i<path to mdl include folder>

In my case, it is

set MDL_COMP=-iF:\Bentley\Program\MicroStation\mdl\include

This will help compiler to find where the .h (header files with function definitions) files are. Otherwise, you will get the errors such as Can’t include mdl.h

Now, start the compiling process. Use the MCOMP utility first. This will produce .mo file in the same folder where .mc file is.

6

Use the MLINK utility and produce the .MA file.

7

We are there!!

Open Microstation and give the command as

mdl l c:\temp\HelloWorld

It will show a dialog box.

9

You can refer the next lesson  Place a Linestring using MDL where you will learn how a linestring can be placed using MDL, you will also learn about dynamic update in the same lesson.

Cheers!!! smley

.NET Custom Command in Intergraph’s G/Technology (GDesigner)

Today I’m going to show you how to get a very simple Hello World dialog running in the Intergraph G/Technology (GDesigner). Even though this is a pretty simple application, many developers may not know where to start; the probable reason could be that the supplied help is not comprehensive enough at the first sight. I would like to thank Stephan Deckers from Merkator for helping me to bridge the same gap in the past. I am documenting the steps in a very simple manner so that you don’t have to go through the struggle to start .Net development in G/Technology.

Create a dialog in a C# class library

To start with – I used Visual Studio 2012 with G/Technology 10.01 installed on the same machine.

  1. Create new project

newprojhw

  1. Delete existing file which has a default class.

delclass1

  1. Add the references of G/Technology assemblies to the project as:

addref

Click on the Browse button in the Reference Manager.

Go to ..\Program Files (x86)\Intergraph\GTechnology\Program folder and select the following two references.

selref

Check them in the browse panel in the reference manager and click OK.

Make sure they appear in the references.

reftree

  1. Add a windows form to the project. I named it as HelloWorld.

addform

  1. Add a label on the form and set the properties as required.

Helloworlddialog

  1. Add a new class to the project and name it as HW_CCM.
  1. Open the code window of HW_CCM.
  1. Add the references of the assemblies at the top as

refheads

  1. Change the class to public class and implement the Interface IGTCustomCommandModal.

implementinterface

  1. Replace the Activate and TransactionManager methods as follows:

HWmethods

In Activate method you are creating the instance of the dialog box.

  1. You are now done. Now build the class library.

bldhw

bldhwresult

Deploy the class library

  1. Visit the output directory and copy the two files as shown below:

hwcopydll

  1. Note that you refer fileUNCPaths.xml and note the location for Customization node the two files above to the path. In my case its c:\myapp\bin.

xmlnode

Create a Metadata Entry in G/Technology

  1. Open GDesigner.
  1. Insert a new row to Custom Command in the Metadata Explorer.

HWMetadata

  1. Commit edits to the database and refresh Metadata Edits.
  1. Go to Tools->Customize menu.
  1. In Categories select Custom Commands and in Commands panel select the command (in my case it is MyCommand). Drag it to Tools Panel at the top and close.

Test the Dialogbox

  1. Click on the icon, you will see the Hello World dialog.

hwdiagingtch

With some additional coding, the following dialogue displaying the runtime information.

hwadvdiag

I hope this quick tutorial helps. The aim here wasn’t to delve into any huge depth, but provide a very quick “Getting started” application. Enjoy Coding smley